Background
Grayrigg is a village of 242 people (as of 2011) in northwestern England, located in the South Lakeland District 5.5km/3mi east-northeast of Kendal and 65.5km/41mi north of Blackpool (both measurements in linear distance).

Grayrigg is passed on its southern border by the West Coast Main Line, a double- to six-tracked electrified main line connecting London with Glasgow (Scotland) along England’s western coast. Opening in sections between 1837 and 1869 the line is one of the UK’s main railway corridors, carrying all sorts of passenger services along with 40% of the UK’s freight traffic, making it one of the busiest freight-corridors in Europe. Nowadays the entire line is electrified via overhead catenaries and is set up for speeds of up to 200kph/125mph for trains with special tilting suspension (see below) and as much as 177kph/110mph for standard trains. Grayrigg has no station on the line, but is the site of the “Grayrigg Crossover”, a pair of rarely used points allowing trains to change between the two tracks during single track closures.

The train involved
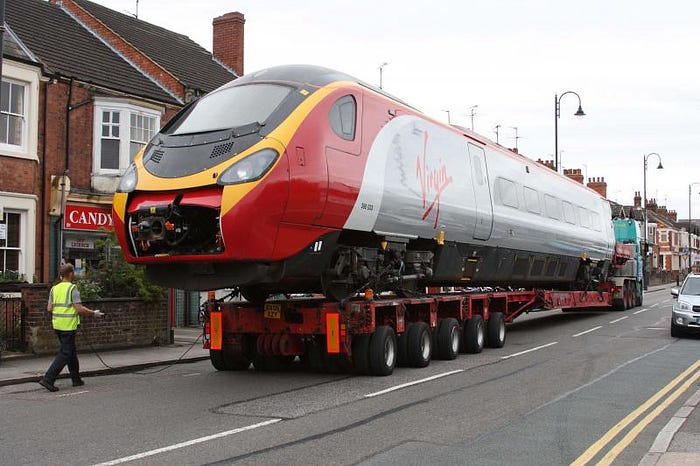
Train number 1S83 was a high speed passenger service from London to Glasgow (Scotland), provided by a Virgin Rail Group (referred to as “Virgin Trains” from here on) Class 390 Pendolino electric high speed train. Introduced in 2002 the Alstom Pendolino is a nine-car multiple unit which was acquired specifically for the West Coast Main Line. Originally delivered as eight-car units the trains were later expanded to 9 cars, which was the configuration of the unit number 390033 “City of Glasgow” when it suffered the accident at Grayrigg. A nine-car unit measures 217.5m/714ft in length at a weight of 466 metric tons and can seat 469 people in a two-class configuration. At the time of the accident 1S83 carried 105 passengers and 4 crew members.
Pendolinos feature a special suspension system developed by Fiat’s railway division which allows them to lean into turns similar to motorcyclists, reaching up to 8 degrees of banking based on the input by sensors reporting the track shape, track angle and the train’s speed. In addition to this many turns on the West Coast Main Line are themselves banked up to six degrees, which in combination allows up to 20 percent higher speeds compared to a standard train. The trains have a top speed of 225kph/140mph, but the infrastructure available in England limits them to 200kph/125mph during operation.

The accident
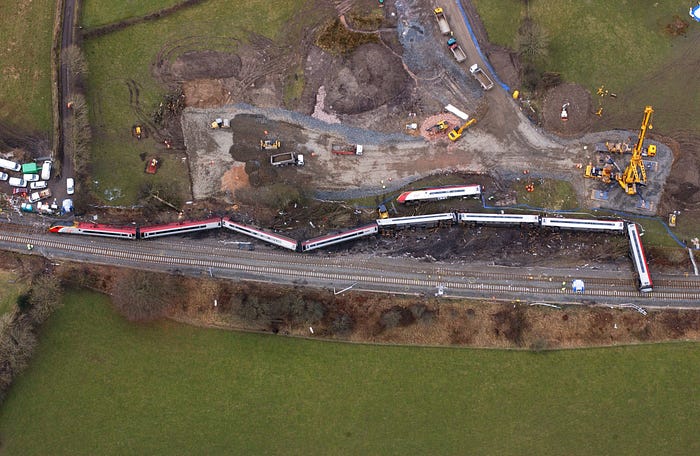
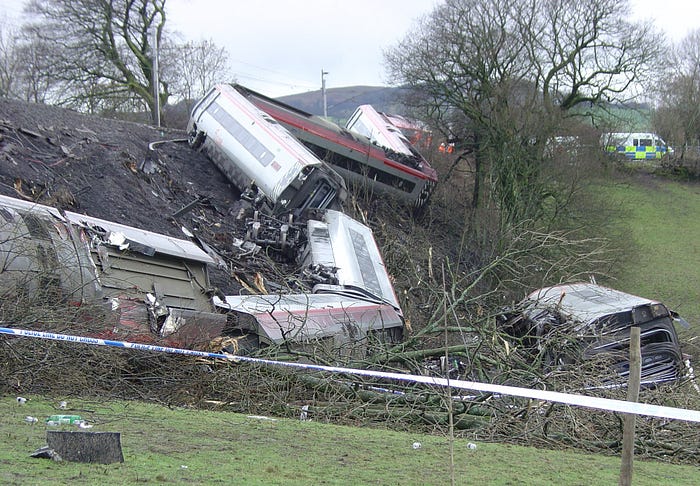
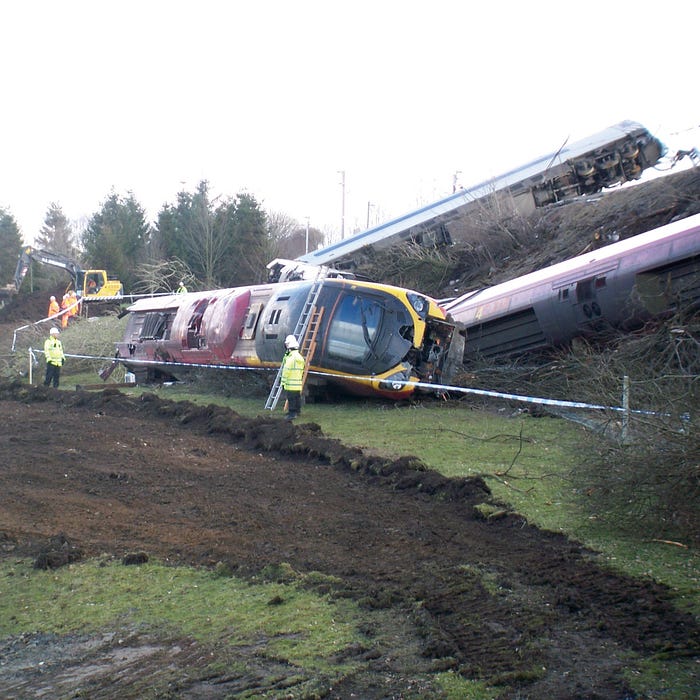
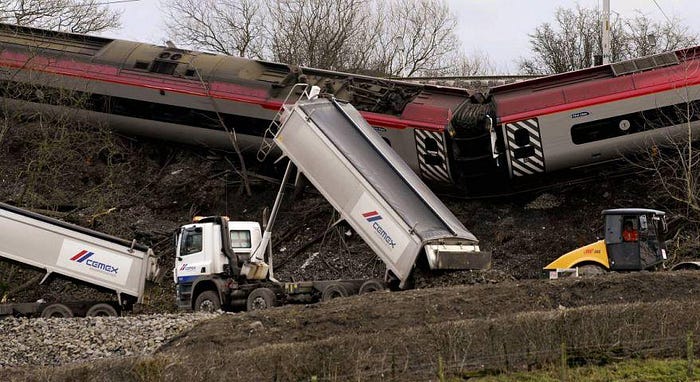
In the early evening hours of the 23rd of February 2007 high speed service number 1S83 is crossing the Docker Viaduct just to the west of the Grayrigg Crossover at 155kph/96mph on its way to Glasgow. The train is under the control of Mister Black, an experienced driver fully certified for the train and route. Moments after the head of the train left the viaduct behind the leading car gets jolted upwards, a moment later described by Mister Black as the train “taking off for a moment”. It is the moment the train reaches the crossover, immediately derailing. Swaying and bucking severely the leading car’s leading axles leave the rails to the side, start to head down an embankment and dig into the wet soil. In a second the leading car turns around 170°, jackknifing against the following car before both fall over. The leading car separates from the train and comes to a halt while the following two cars overtake it, on their sides, before running out of momentum also. The rest of the train derails as well, being forced off the track by the leading cars, with the rear five cars of the train remaining upright and the rear car even staying somewhat aligned with the track. Aside from pre-designed crumple zones at the entrance areas the train cars maintain their survival space essentially in full, but two passenger are ejected as their train car rolls over. 90 people are injured, 31 of which suffer severe injuries mostly by being flung against various objects in the train interior or being hit by various objects flying around the interior.
Aftermath
The light inside the train cars failed during the derailment, plunging the passengers into darkness as the train came to a rest next to the rail line. The first calls to emergency services were placed moments after the train came to a rest, coming from inside the stricken train. In a short time the level of the alarm was raised several times, within the hour over 500 people were involved in the rescue operation, along with over a dozen vehicles and several helicopters including rescue helicopters from the Royal Air Force. The rescue operation was slowed down by the remote location of the wreckage along with narrow access roads and responders with or without vehicles struggling to cross muddy fields in sustained rainfall as evening turned to night. Local farmers ended up using quad bikes, tractors and other four-wheel-drive vehicles to transport personnel and equipment or to tow responding vehicles free.
Survivors who didn’t require immediate hospitalization were led to Grayrigg’s primary school to protect them from the elements and keep them from wandering off into the night as ambulances and helicopters took the more severely injured survivors to various hospitals. The extraordinarily rigid construction of the Pendolino’s cars was later credited with saving lives and reducing injuries as they remained largely intact rather than getting crushed or ripping open. Regardless, a few hours after the accident news broke that an 84 years old passenger, Miss Masson, had succumbed to her injuries aboard the helicopter taking her to a hospital, becoming the sole fatality of the derailment.
Investigators descended on the site before the night was over, recovering the train’s data-logger and starting to look for signs of what might have thrown the train off its tracks at a rather random site. Sir Richard branson, chairman of the Virgin Group, visited the site the day after the accident, talking to reporters and hailing Mister Black a hero as he had not used the time between the first “buck” and the eventual rollover to retreat from his position but tried to do anything he could to help his passengers. Black would later claim that being at the controls is what he’s there for and that it never crossed his mind to retreat from there or try to leave the train after the accident. He had actually been thrown from his seat during the accident and was knocked unconscious during most of the derailment, once he regained consciousness, despite extensive injuries, he used the only available means of communication, his personal phone in his pocket, to call an off-duty coworker and instructed him to notify Virgin Trains of the derailment and have traffic on the line halted.
Branson further complimented the construction of the Pendolino Train, calling it a tank of a train, and rightfully adding that the accident would have gone much worse with older rolling stock.
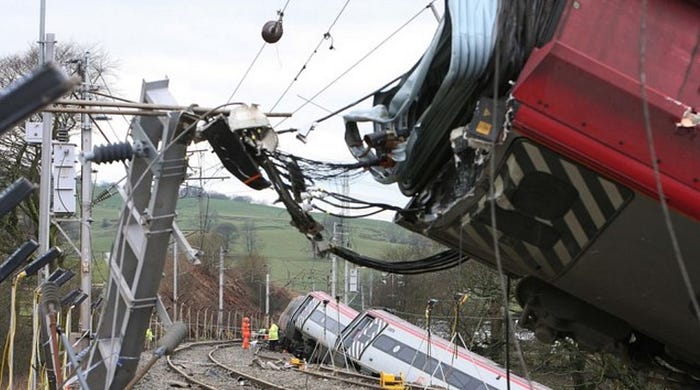
With absolutely no fault to be found on the train and no wrong behavior by the driver being evident the investigation turned its attention to the tracks, and soon found themselves on the correct path. The set of points the train had passed at the crossover, numbered 2B, was in a “severely deteriorated state”, which the investigation concluded was not caused by the accident but in fact had likely caused it instead. This suspicion led the investigators to, after painstakingly documenting the condition of the points at the site, secure them in their position and have them removed from the site as a whole to be taken to a lab for further examination.
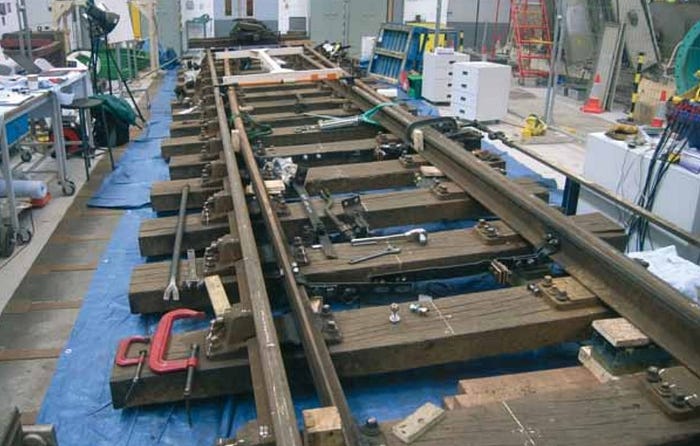
To understand the following one has to have a basic understanding of how the points operate to allow trains to either continue straight ahead of turn off their current track. At a set of points the solid outer rails actually divert, the outside one continuing straight ahead while the inside rail following the curvature of the “turning option”.A pair of movable rails called the switch rail or tongue is installed between the outer rails and can be moved left or right by a motor depending on the input it receives from the signal box. One side of the switch rail lies against its side’s outer rail to allow the train wheels to smoothly transition onto it while the other remains separated from the outer rail on its side with enough space for the train wheels to safely pass in between the outer rail and the switch rail to proceed along that rail’s route.
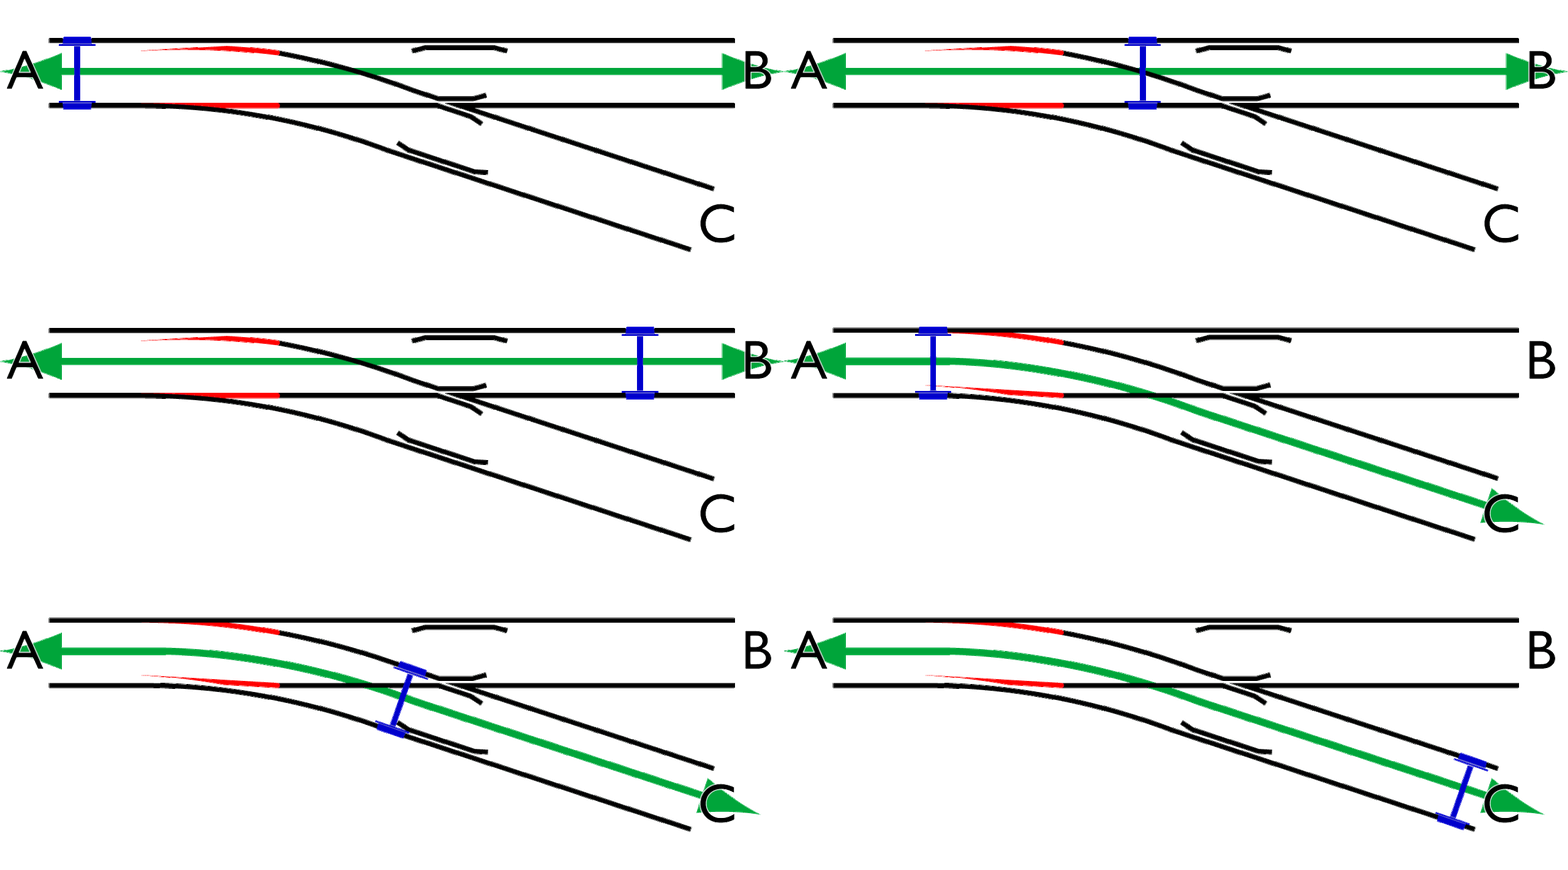
To ensure the proper distance between the two switch rails they are connected to each other by three so-called stretcher bars, rectangular steel struts bolted to the inside of the rails strong enough to maintain the switch rail’s shape and measurements even under the forces of a train being forced into a turn by them, along with a “locking stretcher bar” at the first permanent stretcher bar intended to reinforce the section and help transmit input from the points motor.
Upon examining points 2B at the site of the accident investigators found the switch rail to be improperly aligned with both outside rails, being too close to one rail while not being close enough to the other one. The cause for this was shockingly obvious, as all three permanent stretcher bars and the locking stretcher bar had failed in ways later decided to not be caused by the accident. The locking stretcher bar, which the the train would reach first, was simply not bolted to the left hand switch rail, while the first stretcher bar was disconnected from the left hand switch rail. The second stretcher bar was missing and the third stretcher bar had fractured and separated. In addition to this the investigators found most of the hardware meant to connect the stretcher bars to the switch rail sitting in the ballast near their supposed position.

Scratches on top of the fixed outer rail and impact markings on the left hand switch rail were the final puzzle-piece for the events of the night, with the investigators concluding that 1S83 had struck the improperly positioned switch rail, which was the jolt Mister Black felt as the train “taking off”.
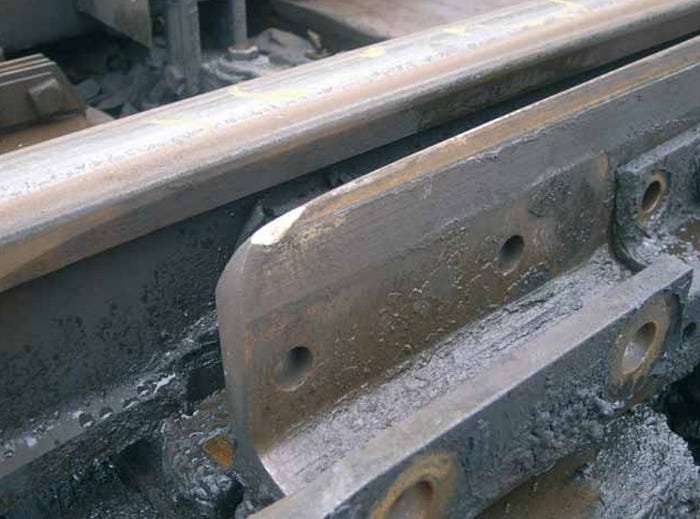
Investigators now knew what had derailed the train, but not how it had come to be in that condition to begin with. The report notes that almost all the missing hardware was found in the immediate vicinity of the site, only one bolt couldn’t be recovered even after a lengthy search of a wider area. One of the locking stretcher bar’s bolts was found between the left hand switch rail and the outer rail, with damage to the head of the bolt and the rails indicating that the switch-rail and moved and squeezed it several times ahead of the accident.


Upon closer examination the bolt it the investigators noticed increasing wear and damage to its threads as the threads neared the head of the bolt, which matched the theory that the nut holding the bolt in place had gradually worked itself loose from the vibrations of rail traffic, eventually falling off and allowing the bolt to slip out as the locking rail separated from the stretcher bar.
The first permanent stretcher bar fractured right where it mounted to the isolating bracket connecting it to the left hand switch rail, as the surface created by the fracture was completely free of corrosion investigators concluded that this failure had occurred a few days ahead of the accident at most. One of the stretcher bars fasteners was missing entirely, the other was present but found to be only finger tight. Further hardware from the bar and its brackets was found sitting in the ballast below the switch rail.
The second permanent stretcher bar had completely disappeared from its position, leaving nothing but a rusty imprint and two loose bolts at its mounting-position. Investigators eventually found two pieces of it over 50m/164ft down the line, examination and metallurgic analysis proved that the fragments were part of the missing stretcher bar.
An inquiry into the maintenance procedures revealed that workers were meant to use torque wrenches to install nuts and bolts with a specific tightness, but apparently it was commonplace to use normal open-ended wrenches and “try to match the tightness” instead. This likely led to the bolts being tightened insufficiently which made it easier for vibrations to loosen them to the point of falling off.


Lastly, the third and final permanent stretcher bar was found where it belonged, at least, but had broken in two places and missing the torn-off isolating bracket on one side. It was thus just as useless for its purpose as if it had not been there. The other bracket itself had also completely detached from the rail, meaning even without the fractures the bar was useless. Investigators traced the damage to all stretcher bars to excessive fatigue, and finally managed to present a timeline for the failure of the set of points. The stretcher bars had failed “in reverse order”, with the third permanent stretcher bar having its right hand bracket detach from the switch rail as the bolts worked themselves lose, allowing some undesired freedom of motion for the rails. A load-change, likely a train driving over the points, then caused the switch rail to try and widen, which overloaded the fatigue-damaged bar itself and caused it to fracture. This meant the brackets of the second permanent switcher bar had to cope with much higher forces than they were designed to handle, causing them to fail and detach the bar from the rails. Lastly, the already partially detached first permanent stretcher bar and its adjacent locking stretcher bar (connected to the points motor) failed, completely detaching the two rails from one-another. This also made the points inoperable, but since they were very rarely used this went unnoticed.
In a final bit of morbid coincidence the report proposes that the locking bar’s bolt being trapped between the switch rail and permanent rail and keeping them 22mm apart created a narrowing distance between the rails which caused the derailing train to slip off the tracks rather than running into an excessively wide gauge and derailing but remaining aligned with the track, an accident that might have had less severe consequences. Either way, the train derailed because a faulty switch rail created a setting that was neither “straight ahead” or “turn”, which is impossible to navigate. As it went the train was forced off the tracks to the side, into a steep embankment where the train cars rolled over as their wheels dug into the soft soil.

The report thus blames the accident on a worn out set of points which was not removed from the line due to lackluster maintenance protocols failing to find it in time. The investigation had actually published a “preliminary release” when they had found that the stretcher bars had failed ahead of the derailment. After the cause of the accident became public Network Rail, the United Kingdom’s rail infrastructure company, issued a statement by Mister Armitt, its chief executive, about how Network Rail was devastated by the conclusion that the condition of the points had caused the terrible accident and that he apologized “to all the people affected by this failure of the infrastructure”.
The investigation noted that Network Rail’s New Track Measurement Train (NMT) had passed the site of the accident on the 21st of February, two days before the accident. The NMT is a special maintenance train based on the Intercity 125 high speed train. The bright yellow train (which created the nickname “flying Banana”) carries various testing equipment such as several lasers, gyroscopes and accelerometers to measure the condition and behavior of the track it is passing over, recording data like track gauge, alignment, banking and distortion. There are also cameras mounted to record both the overhead catenaries and the tracks ahead and behind the train. The NMT was developed in response to the 2000 Hatfield derailment, which claimed 4 lives after a train derailed due to a broken rail going unnoticed.

While it can inspect a lot of infrastructure components, such as the tracks, overhead catenary and the radio system the NMT is not set up to specifically examine points as it passes over them. The investigation actually inquired about if the video footage from the onboard cameras couldn’t have been used to detect the damage at the later site of the accident a Network Rail spokesperson explained that the train runs up to 18 hours a day, seven days a week and travels at speeds of 153kph/95mph (such as at the site) to 200kph/125mph elsewhere. It’s thus impossible to spot defects such as the fault points at Grayrigg in the live video feed, the purpose of the footage is to later go back and reference it in slow-motion when a fault has been detected by the other systems.
The introduction of the new trains as a near-complete replacement for workers walking the track and visually inspecting it had actually been heavily criticized for reasons exactly like that, with many claiming that the train simply couldn’t be as thorough as an experienced human inspector. Adding insult to injury was the fact that even with the trains taking over a lot of the work the maintenance-division was short-staffed, with workers lacking sufficient time and tools to properly do their jobs. This shortage was also the reason behind Network Rail admitting that a scheduled visual inspection by workers at the site of the accident just days before it took place had been cancelled. They simply didn’t have the staff needed to perform it.
During the course of the investigation three Network Rail employees were arrested on charges related to the derailment, among them was Mister Lewis, who had been a vocal opponent of the NMT-trains and had also been at the site of the crash just after it happened. In a 2017 interview he says how, walking up to the wreckage the night after the accident, he thought that not many people would come out of it alive. He recalled being interviewed by police several times after being arrested, how he would be released and then asked to return for more questioning several times. By the time charges against him and his two coworkers were dropped he was suffering from a severe depression, losing his marriage, house and eventually also his job. He did note in the interview that it’s nothing like what the survivors and victims of the derailment went through, but that it’s still a lot of damage for, as the courts decided, doing nothing wrong.

In the end the investigation couldn’t conclude who was personally responsible for the lackluster maintenance which led to the derailment, if anyone actually was, and thus charges were filed in January 2012 against Network Rail itself over the company “failing to provide and implement suitable and sufficient standards, procedures, guidance, training, tools and resources” related to the inspection and maintenance of stretcher bar points. Network Rail’s representation plead guilty on the charges and, in April 2012, was fined 4.1 Million British Pounds (5.4 Million GBP/6 Million Euros/5.8 Million USD in 2022) including the cost of the trial.
In an arguably insulting timing-coincidence Mister Armitt, chief executive of Network Rail at the time of the accident, was awarded Knighthood “for services to engineering and construction” the same day it was announced that Network Rail would be prosecuted. He wasn’t being knighted for engineering and construction of railways, but it still seems unfortunate, and the family of Miss Masson, the accident’s sole fatality, even argued that he shouldn’t have been knighted at all.

The official report closes with a lengthy list of recommendations aimed at improving the maintenance and inspection of rail lines as a whole and points in particular, along with improving the training of the staff for those tasks. In early 2010 Network Rail announced plans to cut almost 1500 jobs from its maintenance division, something fiercely protested by the National Union of Rail, Maritime and Transport Workers (RMT), revealing that six of the ten main recommendations issued in the aftermath of the Grayrigg Derailment had either not been implemented at all or in an unsatisfactory manner. The British Rail Accident Investigation Branch (RAIB) had actually added a section on the Grayrigg derailment to the report of a 2008 derailment at Marks Tey explaining that there was no sign that remotely sufficient work at Network Rail had been done. The accident at Marks Tey had also been caused by faulty rails which went unnoticed due to lackluster maintenance.
Since then Network Rail claims to have made “big improvements”, referring to the British rail network as the safest in Europe. The truth of that claim, one may worry, remains to be seen. There is no memorial at Grayrigg, nothing points to the events that took place there.
On an odd sidenote Mister Black, the driver of the stricken train, Mister Lewis, the track maintenance manager for the area at the time, and George Masson, the son of the accident’s sole fatality, have actually become friends since the accident. Visiting the site for the 2017 interview mentioned above Lewis noted that having the relationship to them helps all three cope with the consequences of the accident, and that they like that something good came from the tragedy. Mister Black had to retire from driving trains after the accident when, after initially recovering from his injuries, arthritis befell a damaged vertebra in his neck. He explained in the interview that him and his wife always have the events of the night at the back of their mind, that they “come up” as vividly as ever on each anniversary, and that they will never forget it. Mister Masson explained that each anniversary is a difficult day for him, that he can only cope by “locking himself away”, spending the anniversaries alone. He expressed that his mother still plays a role in the family, that they still think about her and make sure to keep her memory alive.
Virgin Trains’ contract for the line expired in December 2019 and was not renewed, with the trains changing ownership to Avanti West Coast, a Scottish-Italian company. As of writing this (Fall 2022) the Pendolino-Trains are undergoing an extensive refurbishment intended to place them in “as new” condition for several more years. “City of Glasgow” remains the only unit pulled from service, being formally written off in November 2007. Most of the train was scrapped, with only the rear two cars, who suffered very minor damage, being saved from the scrapyard and instead going to (at the time) Virgin Trains’ training center after being repaired. It’s unknown if they are still there.
_______________________________________________________________
A kind reader has started posting the installments on reddit for me, I cannot interact with you there but I will read the feedback and corrections. You can find the post right here. Please give it some love, I’m very thankful for the posts being published there.